This article covers step by step details to configure Jenkins, Maven and IIB for Build Automation and Deployment.
Build you IIB projects once and deploy the BARs to multiple environments after over-riding the environment specific properties.
This article does not cover using Maven Release plugin for making release. I will cover that in separate post.
Environment: IIB v9
Jenkins
Maven
SOAPUI
TFS
Windows
SQL Server (for auditing)
A. Jenkins & Maven Installation and Configuration
1.1
Installing and
Configuring Maven


1.2 Installing and
Configuring Jenkins


1.2.4 Restarting
Jenkins Server

B. IIB Build, Deployment and WebServices Test Automation
2.1
Converting IIB
Project to Maven Project and Configuring POM


2.2 Configuring SOAPUI project as Maven Project
2.3 Configuring IIB
Build Jenkins Job


2.4 Configuring
SOAPUI jenkins job


2.5 Configuring IIB
deployment Jenkins job


2.6 Grouping the jobs
for easy view


Build you IIB projects once and deploy the BARs to multiple environments after over-riding the environment specific properties.
This article does not cover using Maven Release plugin for making release. I will cover that in separate post.
Environment: IIB v9
Jenkins
Maven
SOAPUI
TFS
Windows
SQL Server (for auditing)
A. Jenkins & Maven Installation and Configuration
Below steps have been covered
under this head:
n Installing and Configuring Maven
n Installing and Configuring Jenkins
n Restarting Jenkins server
1.1
Installing and
Configuring Maven
Install Maven
3.3.3 or latest version. We have used version 3.3.3 here.
Below are steps to do it:
-- Download Maven 3.3.3 Binary Zip archive from https://maven.apache.org/download.cgi
-- Extract distribution archive in any directory
-- Download Maven 3.3.3 Binary Zip archive from https://maven.apache.org/download.cgi
-- Extract distribution archive in any directory
-- Ensure JAVA_HOME environment variable is
set and points to your JDK installation

-- Add the bin
directory of the created directory apache-maven-3.3.3 to the PATH environment
variable

-- Confirm with mvn -v in a
new shell. The result should look similar to below

-- Change the maven local repository in settings.xml. You can find
settings.xml in 'conf' directory inside your maven installation directory

This completes our maven configuration.
1.2 Installing and
Configuring Jenkins
Since we are using Windows system, we will use windows
installer for Jenkins so that it will configure a windows service for Jenkins.
Download the Windows
installer from below url:
http://jenkins-ci.org/content/thank-you-downloading-windows-installer
http://jenkins-ci.org/content/thank-you-downloading-windows-installer
We are using the version 1.625.2.
Make sure you download the stable release version.
Its installation is
straightforward. Once installation is complete, you can access jenkins using
below url:
http://localhost:8080
http://localhost:8080
1.2.1
Install
Plugins
Since we will use AD server for user authentication, first
install the ActiveDirectory plugin:
Go to Manage Jenkins à
Manage Plugins
Click on ‘Available’ tab and look for plugin ‘Active Directory
plugin’ and install it.

Following the same way, install below plugins:
1.2.2 Go to Manage Jenkins à
Configure Global Security
Select
the check box ‘Enable Security’ and Security Realm ‘Active Directory’ and
Authorization ‘Project-based Matrix Authorization Strategy’.

Add users and groups with required privilege:

1.2.3 Configure
System
Go to Manage Jenkins à
Configure System
Set the ‘# of executors’ to the number of
processors on the Jenkins server. Leave other fields with default value in this
section.
Complete the Maven Configuration as per the
screen-shot below:

Add the
JDK installation as per the screen-shot below:

Add Maven
installation and configure as below in screen-shot:

In
‘Jenkins Location’, update the url to have hostname instead of ‘localhost’ and
enter System Admin e-mail address:

Configure the ‘Artifact Resolver’ as below in screen-shot.
We have configured below url :

Configure scheduled clean-up of maven repository that you
configured:

Configure SMTP server for email notification and Audit to
Database plugin. Make sure that the server’s IP is added in WhiteList to send
email. Also, since we are using SQL server database, make sure that you put
sqljdbc4.jar at below path for Jenkins:
war/WEB-INF/lib
In our case, the absolute path is:
D:\DevOps\Jenkins\war\WEB-INF\lib
Complete the configuration as in screenshot below:
SMTP server: smtp.server.com
JDBC Driver class: com.microsoft.sqlserver.jdbc.SQLServerDriver
JDBC Url: jdbc:sqlserver://hostname:1433;databaseName=SAMPLEDB;

Click on Generate DDL. Run this DDL script on the target
database on the server specified in JDBC Url. It will create three tables in
the database:
JENKINS_BUILD_DETAILS
JENKINS_BUILD_NODE
JENKINS_BUILD_PARAMS
This completes our basic configuration. If we add more
plugins for added functionality or need to extend functionality on current
plugins, we will need to do additional configurations.
Supply correct User and Password and ‘Test Connection’ to
database.
1.2.4 Restarting
Jenkins Server
We should take utmost care
when we plan to restart jenkins server. Do not restart it directly by
restarting windows service as it may cause to lose some configuration. Follow
below two steps to do a Jenkins restart.
Prepare Jenkins for Shutdown:
Click on Manage Jenkins à Prepare for Shutdown

After this restart Jenkins
Windows service.
B. IIB Build, Deployment and WebServices Test Automation
Below steps have been covered under this head:
n Converting IIB projects to Maven project and
configuring POM
n Creating SOAPUI projects and configuring POM
n Configuring IIB Build Jenkins job
n Configuring SOAPUI Build Jenkins job
n Configuring IIB Deployment job
n Grouping the jobs for easy view
2.1
Converting IIB
Project to Maven Project and Configuring POM
2.1.1
Install slf4j plugin
First you should install slf4j-api plugin
into your IIB toolkit.
Open IIB toolkit. Go to Help à Install New Software
Add the below site:
Expand ‘Maven osgi-bundles’ and select slf4j-api and
install it.

2.1.2 Install m2e Plugin
Now you should install
Maven-eclipse plugin into your IIB toolkit.
Open IIB toolkit. Go to Help à Install New Software
Add the below site:
Uncheck the check-box ‘Show
only the latest versions of software available’:

Expand ‘Maven Integration for
Eclipse’ and install the version 1.4.1 of ‘m2e – Maven Integration for Eclipse’
and ‘m2e – slf4j over logback logging’:


Complete the installation and
restart toolkit.
2.1.3 Convert IIB project to Maven project
Only convert the main projects to Maven
projects i.e. Applications and Services. Libraries need not to be converted to
Maven project.
Right click on the ‘Application’ or
‘Service’ you want to convert to Maven project.
Configure à Convert to Maven
Project

Set the GroupId: For example: com.ibm.esb
Set the ArtifactId: Name of Application/Service
Set the version
Set packaging to ‘pom’
Click Finish

Below is the sample pom.xml
for an IIB project (for example: PolicySearch_Service). Change packaging to ‘iib-bar’. You can copy-paste
it and just change the yellow high-lighted information respective to the project.
To avoid any issue, make sure that you create
the Jenkins Maven Build job for the Application/Service with the same name as
that of artifactId.
ArtifactId should have the same name as that of IIB Application/Service
project. I have followed this convention. You may have different names; however you will have to manage that complexity.
<project xmlns="http://maven.apache.org/POM/4.0.0"
xmlns:xsi="http://www.w3.org/2001/XMLSchema-instance"
xsi:schemaLocation="http://maven.apache.org/POM/4.0.0
http://maven.apache.org/xsd/maven-4.0.0.xsd">
<modelVersion>4.0.0</modelVersion>
<groupId>com.endur.esb</groupId>
<artifactId>PolicySearch_Service</artifactId>
<version>1.7-SNAPSHOT</version>
<packaging>iib-bar</packaging>
<name>${project.artifactId}</name>
<properties>
<iib.dir>D:\IBM\IntegrationToolkit90</iib.dir>
<eclipse.workspace>D:\DevOps\Jenkins\jobs\${project.artifactId}\workspace</eclipse.workspace>
<project_properties>${basedir}\properties</project_properties>
</properties>
<repositories>
<repository>
<id>central</id>
<name>Central
Repository</name>
<url>http://hostname:8081/nexus/content/groups/public/</url>
<snapshots>
<enabled>false</enabled>
</snapshots>
</repository>
<repository>
<id>centralImage</id>
<name>Central
Repository</name>
<url>http://repo1.maven.org/maven2/</url>
</repository>
</repositories>
<pluginRepositories>
<pluginRepository>
<id>central</id>
<name>Central
Repository</name>
<url>http://hostname:8081/nexus/content/groups/public/</url>
<snapshots>
<enabled>false</enabled>
</snapshots>
</pluginRepository>
<pluginRepository>
<id>central3rdParty</id>
<name>Central 3rd
Party Repository</name>
<url>http://hostname:8081/nexus/content/repositories/thirdparty/</url>
<snapshots>
<enabled>false</enabled>
</snapshots>
</pluginRepository>
</pluginRepositories>
<build>
<defaultGoal>package</defaultGoal>
<resources>
<resource>
<directory>.</directory>
</resource>
</resources>
<plugins>
<plugin>
<groupId>ch.sbb.maven.plugins</groupId>
<artifactId>iib-maven-plugin</artifactId>
<version>2.2</version>
<configuration>
<toolkitInstallDir>${iib.dir}</toolkitInstallDir>
<barName>${project.build.directory}/iib/${project.artifactId}.bar</barName>
<workspace>${eclipse.workspace}</workspace>
<versionString></versionString>
<cleanBuild>true</cleanBuild>
<deployAsSource>true</deployAsSource>
<esql21>false</esql21>
<applicationName>${project.artifactId}</applicationName>
<configPropFileDirectory>${project_properties}</configPropFileDirectory>
<defaultPropertiesFile>${project.build.directory}/iib/${project.artifactId}.properties</defaultPropertiesFile>
<debugWorkspace>true</debugWorkspace>
</configuration>
<extensions>true</extensions>
</plugin>
</plugins>
</build>
</project>
Once you save the changes in
POM, it will show error in project. Right click on project and go to ‘Maven’à ‘Update project’:

2.1.4 Add Properties files respective to each environment
Now since we need to create bar file for
each environment, we should add properties files respective to each
environment. Here I am following the convention on the name of properties
files. Below should be the properties file names corresponding to each
environment:
Dev: DEV.properties
QA: QA.properties
UAT: UAT.properties
PROD: PROD.properties
BAR files for respective environments will
be created with the same name appended with the version number from POM i.e. DEV_1.2.bar, QA_1.2.bar, UAT_1.2.bar and PROD_1.2.bar
Create a folder named ‘Properties’ inside the
Application/Service and create all these properties files inside the
‘Properties’ folder:

Below is a sample for a properties file to override
UDPs and Node properties in PolicySearch service. Set the required properties
to override.
gen.PolicySearch_Service#Audit_BuildCBEMsgRespOut_SubFlow.StoreMessage
= YES
gen.PolicySearch_Service#Audit_BuildCBEMsgReqIn_SubFlow.LogMessage
gen.PolicySearch_Service#Audit_BuildCBEMsgReqIn_SubFlow.FlowDirection
gen.PolicySearch_Service#Audit_BuildCBEMsgReqIn_SubFlow.StoreMessage
= YES
gen.PolicySearch_Service#SetRequestInAuditParms_Compute.dataSource
gen.PolicySearch_Service#SetRequestInAuditParms_Compute.connectDatasourceBeforeFlowStarts
This completes converting IIB
project to Maven project. Check-in the updated project into Source Control.
2.2 Configuring SOAPUI project as Maven Project
Save your SOAPUI project xml file into a folder. Create the
POM file and save it into same folder. Below is the sample POM. Change the yellow high-lighted
part respective to your project.
To avoid any issue, I am following convention on the names and you can follow the same. Make sure that you create the Jenkins Maven Build job
for the SOAPUI project with the same name as that of artifactId and artifactId
name should be same as that of the SOAPUI project xml file. Also, the folder
containing the soapui project xml and pom.xml should have same name as that of
artifactId.
Below is example of PolicySearch SOAPUI project.
<project
xmlns="http://maven.apache.org/POM/4.0.0" xmlns:xsi="http://www.w3.org/2001/XMLSchema-instance"
xsi:schemaLocation="http://maven.apache.org/POM/4.0.0 http://maven.apache.org/maven-v4_0_0.xsd">
<modelVersion>4.0.0</modelVersion>
<groupId>com.ibm.esb.soapui</groupId>
<artifactId>PolicySearch_SOAPUI_Project</artifactId>
<version>1.2</version>
<packaging>jar</packaging>
<name>${project.artifactId}</name>
<properties>
<workspace>D:\DevOps\Jenkins\jobs</workspace>
</properties>
<pluginRepositories>
<pluginRepository>
<id>smartbear-sweden-plugin-repository</id>
<url>http://www.soapui.org/repository/maven2/</url>
</pluginRepository>
</pluginRepositories>
<profiles>
<profile>
<id>Dev</id>
<build>
<defaultGoal>test</defaultGoal>
<plugins>
<plugin>
<groupId>com.smartbear.soapui</groupId>
<artifactId>soapui-maven-plugin</artifactId>
<version>5.0.0</version>
<executions>
<execution>
<id>${project.artifactId}</id>
<goals>
<goal>test</goal>
</goals>
<phase>test</phase>
</execution>
</executions>
<configuration>
<projectFile>${workspace}\${project.artifactId}\workspace\${project.artifactId}\${project.artifactId}.xml</projectFile>
<testSuite>DEV</testSuite>
<endpoint>http://hostname:7950/ESB/PolicySearchService</endpoint>
<outputFolder>${project.build.directory}/surefire-reports</outputFolder>
<junitReport>true</junitReport>
<printReport>false</printReport>
</configuration>
</plugin>
</plugins>
</build>
</profile>
<profile>
<id>QA</id>
<build>
<defaultGoal>test</defaultGoal>
<plugins>
<plugin>
<groupId>com.smartbear.soapui</groupId>
<artifactId>soapui-maven-plugin</artifactId>
<version>5.0.0</version>
<executions>
<execution>
<id>${project.artifactId}</id>
<goals>
<goal>test</goal>
</goals>
<phase>test</phase>
</execution>
</executions>
<configuration>
<projectFile>${workspace}\${project.artifactId}\workspace\${project.artifactId}\${project.artifactId}.xml</projectFile>
<testSuite>QA</testSuite>
<endpoint>http://hostname:7950/ESB/PolicySearchService</endpoint>
<outputFolder>${project.build.directory}/surefire-reports</outputFolder>
<junitReport>true</junitReport>
<printReport>false</printReport>
</configuration>
</plugin>
</plugins>
</build>
</profile>
<profile>
<id>UAT</id>
<build>
<defaultGoal>test</defaultGoal>
<plugins>
<plugin>
<groupId>com.smartbear.soapui</groupId>
<artifactId>soapui-maven-plugin</artifactId>
<version>5.0.0</version>
<executions>
<execution>
<id>${project.artifactId}</id>
<goals>
<goal>test</goal>
</goals>
<phase>test</phase>
</execution>
</executions>
<configuration>
<projectFile>${workspace}\${project.artifactId}\workspace\${project.artifactId}\${project.artifactId}.xml</projectFile>
<testSuite>UAT</testSuite>
<endpoint>http://hostname:7950/ESB/PolicySearchService</endpoint>
<outputFolder>${project.build.directory}/surefire-reports</outputFolder>
<junitReport>true</junitReport>
<printReport>false</printReport>
</configuration>
</plugin>
</plugins>
</build>
</profile>
<profile>
<id>Prod</id>
<build>
<defaultGoal>test</defaultGoal>
<plugins>
<plugin>
<groupId>com.smartbear.soapui</groupId>
<artifactId>soapui-maven-plugin</artifactId>
<version>5.0.0</version>
<executions>
<execution>
<id>${project.artifactId}</id>
<goals>
<goal>test</goal>
</goals>
<phase>test</phase>
</execution>
</executions>
<configuration>
<projectFile>${workspace}\${project.artifactId}\workspace\${project.artifactId}\${project.artifactId}.xml</projectFile>
<testSuite>PROD</testSuite>
<endpoint>http://hostname:7950/ESB/PolicySearchService</endpoint>
<outputFolder>${project.build.directory}/surefire-reports</outputFolder>
<junitReport>true</junitReport>
<printReport>false</printReport>
</configuration>
</plugin>
</plugins>
</build>
</profile>
</profiles>
</project>
Your SOAPUI Maven project is ready now. Check this into
Source Control.
2.3 Configuring IIB
Build Jenkins Job
Logon to Jenkins using your
credentials.
2.3.1
Configuring Build Job for Libraries
Click on ‘New Item’.

Enter the name of Library project. Make
sure the ‘Item name’ is set to the name of the library project.
Select ‘Freestyle project’ and click ‘OK’.

In Source Code Mangement, enter the information.
Make sure that you uncheck ‘Use Update’.
Name of ‘Local workfolder’ should be exactly same as
that of the job name i.e. the library project name.

Click on ‘Add Post-build Action’ and add ‘Archive the artifacts’. Enter ‘**’
in ‘Files to archive’.

Click ‘Save’.
If there are already existing jobs for library, you
can select option ‘Copy existing Item’ and click ‘OK’ and then update the items
respective to your library project.
2.3.2 Configuring Jenkins job for IIB Application/Service
Click on ‘New Item’.
Enter the ‘Item name’. It should be the
value of ‘artifactId’ from POM i.e. IIB project name.
Select ‘Maven project’ check box and click ‘OK’.

Fill the ‘Source code management’ parameters. Uncheck ‘Use update’ and enter
job name in ‘Local workfolder’.

Now add the referenced libraries to build as pre-step
for build.

Add all the referenced libraries in pre-build step.

Now add the pre-build step to copy artifacts from all the
referenced libraries into workspace

Add this step for all the referenced libraries.

Now add the build step and maven goals.


Add email notification.

Now add post build actions.
Add the action ‘Deploy
artifacts to Maven repository’


Add action ‘Audit job info to database’


Add task ‘Create a label in TFS’.

Add action ‘Delete workspace when build is done’.


Click Apply and Save.
If there are already existing jobs for
applications/services, you can select option ‘Copy existing Item’ and click
‘OK’ and then update the items respective to your project.
2.4 Configuring
SOAPUI jenkins job
Click on ‘New Item’.
Enter the artifactId in ‘Item name’ and select the
check box ‘Maven project’ and click OK.

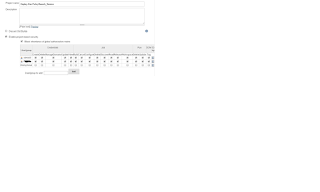
Select the check box ‘This build is parameterized’ and
enter String parameter. Name of parameter should be ‘env’ and default value
‘Dev’.

Enter the information in Source Code management
section. Uncheck ‘Use update’. ‘Local workfolder’ should be set to artifact Id.

Enter the parameter values in Build
section.
In Goals and options, enter ‘clean test –P${env}’.


Enable email notification.

Add the post build actions ‘Audit job info to
database’ and ‘Delete workspace when build is done’.

Click Apply and Save.
If there are already existing jobs for soapui, you can
select option ‘Copy existing Item’ and click ‘OK’ and then update the items
respective to your project.
2.5 Configuring IIB
deployment Jenkins job
Click
on ‘New item’.
Give
the item name as per below convention. You can follow any convention, but I have followed this :).
Deploy.{Environment}.{Jenkins Build Job
Name}
For
example, If I want to create deployment jobs for IIB Build job
‘PolicySearch_Service’, below will be the names of deployment jobs corresponding
to each environment:
Deploy.DEV.PolicySearch_Service
Deploy.QA.PolicySearch_Service
Deploy.UAT.PolicySearch_Service
Deploy.PROD.PolicySearch_Service
Select
the ‘Freestyle project’ and click OK.

If
you want only specific people or group to have deployment access for a
particular job, select checkbox ‘Enable project based security’ and check the
check-box ‘Block inheritence of global authorization matrix’ and add the group
and people. We would probably use this option for Prod deployment jobs to limited prod deployment access to selected people only.

Select
the check box ‘This build is parameterized’. Add a string parameter with the
name ‘VERSION’ and default value ‘RELEASE’.

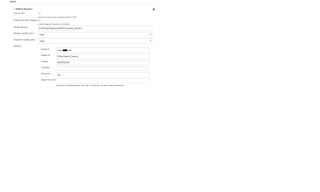
Add
a build step ‘Artifact resolver’.

Enter
the target directory, for example as below:
D:\DevOps\Deployment\{Jenkins
Build job name}
For
example, for Policy Search service:
D:\DevOps\Deployment\PolicySearch_Service
Enter
the GroupId, ArtifactId and Version information and ‘zip’ in extension:

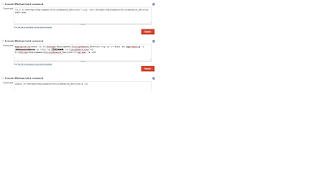
Add
three build steps ‘Execute Windows batch command’. We can put all these command
in one step also, however for clarity, we have put them in three separate
steps.
The
first step will extract the environment specific BAR file from nexus repository
and save it in Target directory specified in ‘Artifact Resolver’ step:
Below
are the sample commands for PolicySearch_Service. You will need to update these
for your respective project in corresponding environment. Here we are using 7z utility to extract bar files from zip.
Dev deployment job:
7z e
D:\DevOps\Deployment\PolicySearch_Service\*.zip -oD:\DevOps\Deployment\PolicySearch_Service
DEV*.bar
QA deployment job:
7z e
D:\DevOps\Deployment\PolicySearch_Service\*.zip -oD:\DevOps\Deployment\PolicySearch_Service
QA*.bar
UAT deployment job:
7z e
D:\DevOps\Deployment\PolicySearch_Service\*.zip -oD:\DevOps\Deployment\PolicySearch_Service
UAT*.bar
PROD deployment job:
7z e
D:\DevOps\Deployment\PolicySearch_Service\*.zip -oD:\DevOps\Deployment\PolicySearch_Service
PROD*.bar
The
second command window will pick the bar file and deploy to specified target
integration server. Below example shows command to deploy PolicySearch_Service
dev bar file to Dev environment.
mqsiprofile&&for
/r D:\DevOps\Deployment\PolicySearch_Service %%g in (*.bar) do mqsideploy -i
hostname -p 1416 -q QMGR-e ClaimsServices -a
D:\DevOps\Deployment\PolicySearch_Service\%%~ng.bar -w 120
The
third command window will clean-up the Target directory specified in ‘Artifact
Resolver’ step:
rmdir
D:\DevOps\Deployment\PolicySearch_Service/s /q

Add
post build actions ‘Audit job info to databse’ and ‘Email notification’.

After
deployment this job needs to trigger regression test suit (for Web-Services
scenraio here).
Add
post build action ‘Trigger parameterized build on other projects’ and give the
soapui project job to trigger. For example, here we will trigger PolicySerach
SOAPUI project. In the parameter ‘env’, pass the environment name so that
corresponding Test-suit will be executed.

Click
Apply and Save.
If there are already existing jobs for soapui, you can
select option ‘Copy existing Item’ and click ‘OK’ and then update the items
respective to your project.
2.6 Grouping the jobs
for easy view
Let us first group the IIB
Build Jobs. Click on the ‘IIB Build Jobs’ tab and click on ‘Edit view’.

In ‘Job filters’, make sure
that all IIB build jobs are selected.

Add a ‘Regex Grouping Rule’
in ‘Job group categorization’ for the new group you are creating. Below are the
examples that show few groups.

Click Apply and OK.
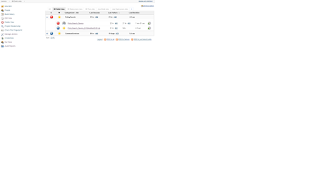
Now you would be able to see
your jobs properly categorized and grouped:

For IIB Deployment jobs,
Regular expressions can be written as in below screenshot. So if you follow the
specified convention in this article, your deployment jobs will be
automatically put in correct group i.e. DEV, QA, UAT or PROD.

You need to do is add the
deployment job in ‘Job filters’.

Hi mr Awasthi, thank you for this nice post. I have a question please. I have been able to create an application on the toolkit the maven conversion worked fine and the maven clean package worked also. After i created a complete LCM with Jenkins, Nexus and SVN. I made a project on jenkins but the mqsicreatebar is soooooo slow. Do you have any recomandations please? Thank you very much. Regards.
ReplyDeletethank you for sharing this post. i enjoyed reading this. the concepts are clearly explained.
ReplyDeletedevops training in chennai
Nice informative post...Thanks for sharing..DevOps Online Training in Hyderabad
ReplyDeleteGreat blog article informative I liked it
ReplyDeleteWe are the best piping design course in Hyderabad, India. Sanjary academy Offers Piping Design Course and Best Piping Design Training Institute in Hyderabad. Piping Design Institute in India Piping Design Engineering.
best Piping Design Course
piping design course with placement
pipe stress analysis course in hyderabad
piping engineering course in hyderabad
piping stress analysis course
best Piping Design institute
best institute of Piping Design Course in India
Piping Design Course in Hyderabad
Piping Design Course
Piping Design Course in India
Thanks for the information. It's very useful.
ReplyDeleteDevOps Online Training in Hyderabad
DevOps Training Online
Very Useful article, Thanks For Sharing With Us
ReplyDeleteHere a related Stuff:
Digital Marketing Course Online Free
What Is SEO
Digital Marketing Online Training
Digital Marketing Training Online
mobile phone repair in Memphis
ReplyDeleteiphone repair in Memphis
cell phone repair in Memphis
phone repair in Memphis
tablet repair in Memphis
ipad repair in Memphis
mobile phone repair Memphis
iphone repair Memphis
cell phone repair Memphis
phone repair Memphis
very nice blogs!!! i have to learning for lot of information for this sites...Sharing for wonderful information. Thanks for sharing this valuable information to our vision. You have posted a trust worthy blog keep sharing
ReplyDeleteDigital Marketing In Telugu
Digital Marketing In Hyderabad
internet marketing
Digital marketing
Digital Marketing Strategy
Thanks for sharing!! That's a really interesting article.
ReplyDeleteDevOps Training in Bangalore | Certification | Online Training Course institute | DevOps Training in Hyderabad | Certification | Online Training Course institute | DevOps Training in Coimbatore | Certification | Online Training Course institute | DevOps Online Training | Certification | Devops Training Online
Excellent Blog! I would Thanks for sharing this wonderful content.its very useful to us.I gained many unknown information, the way you have clearly explained is really fantastic.
ReplyDeleteoracle training in chennai
oracle training institute in chennai
oracle training in bangalore
oracle training in hyderabad
oracle training
hadoop training in chennai
hadoop training in bangalore